6-Inch Stainless Steel Chimney Liner Kit: A Denver-Tested Relining Solution
![]() A 6-inch stainless steel chimney liner kit is the part most Denver homeowners need when an old clay flue cracks, an appliance gets swapped out, or an inspection turns up a venting problem. The Flex-All 6-inch by 25-foot kit is the one I reach for again and again, because it gives you professional-grade parts at a price that doesn't make you wince. I've put hundreds of liner systems into homes all over the metro, from Park Hill bungalows to Littleton split-levels, and this kit has everything you need for a safe install that passes inspection.
A 6-inch stainless steel chimney liner kit is the part most Denver homeowners need when an old clay flue cracks, an appliance gets swapped out, or an inspection turns up a venting problem. The Flex-All 6-inch by 25-foot kit is the one I reach for again and again, because it gives you professional-grade parts at a price that doesn't make you wince. I've put hundreds of liner systems into homes all over the metro, from Park Hill bungalows to Littleton split-levels, and this kit has everything you need for a safe install that passes inspection.
If you've never thought much about what's inside your chimney, you're not alone. Most people only find out their flue is shot when smoke starts rolling back into the living room or an inspector hands them a photo of a cracked tile. The liner is the metal pipe that carries smoke, heat, and combustion gases up and out. When the original clay liner fails, a stainless steel one like this is usually the fix.
I've lost count of how many of these 6-inch Flex-All liners I've dropped down Denver chimneys. The reason I keep buying them is simple: the 316 steel holds up, the tee comes in the box, and I'm not chasing down five different parts the morning of a job. When a customer asks what I'd put in my own house, this is the honest answer.
- Adam, Owner, Adam Chimney Sweep
Why Denver Homeowners Choose This System
![]() This single-ply 316 stainless steel liner bends enough to snake through the offset flues you find in a lot of Denver's older houses, but it's still tough enough to handle our wild temperature swings. The 0.006-inch wall thickness hits a sweet spot. Thin enough to flex around a bend, thick enough to last. I've run this exact liner in homes across Denver County, and it vents wood stoves, gas fireplaces, pellet inserts, and high-efficiency furnaces without complaint.
This single-ply 316 stainless steel liner bends enough to snake through the offset flues you find in a lot of Denver's older houses, but it's still tough enough to handle our wild temperature swings. The 0.006-inch wall thickness hits a sweet spot. Thin enough to flex around a bend, thick enough to last. I've run this exact liner in homes across Denver County, and it vents wood stoves, gas fireplaces, pellet inserts, and high-efficiency furnaces without complaint.
The 316 grade is a bigger deal than most folks realize. Plain 304 stainless is fine for a lot of jobs, but 316 has molybdenum mixed in, and that extra ingredient shrugs off the acidic moisture that modern high-efficiency appliances spit out. During cold-morning startups here in Denver, that condensation can chew through a cheaper liner over time. Spending a little more on the better alloy now saves you from tearing the whole thing out in eight years.
Here's the short version of why 316 beats 304 in our climate:
- Better corrosion resistance. The added molybdenum fights acidic condensate from gas and high-efficiency units.
- Longer service life. I've pulled corroded aluminum and 304 liners that didn't make it a decade. Properly installed 316 routinely outlasts them.
- Handles temperature extremes. Denver can swing 40 degrees in a day. The alloy takes the expansion and contraction in stride.
- Works with more appliances. Wood, gas, pellet, oil — one liner material covers the common setups I see.
That last point matters if you're thinking about changing appliances down the road. Put in a liner that only suits your current wood stove, and you may be back to square one when you switch to a gas insert. A 316 liner gives you room to change your mind.
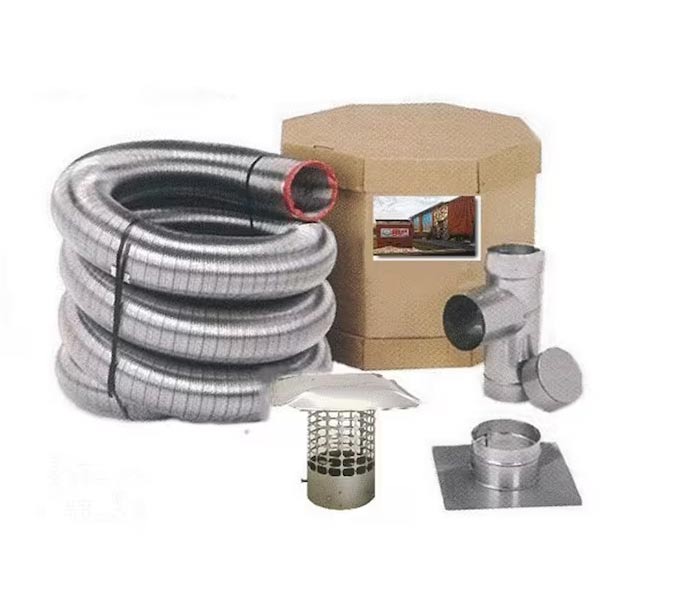
What Comes in the Kit
This kit includes everything you need for a proper install: the 25-foot liner, a two-part tee with a cleanout cap, a 4-inch by 14-inch top plate with a rip collar, a round termination cap, all the fasteners, the installation instructions, and the warranty paperwork. A lot of competitor kits make you buy the tee assembly on its own, so having it in the box here saves you somewhere around $80 to $120 in extra parts.
The 14-inch top plate fits the standard masonry chimney tiles you'll find in most Denver-area homes built between the 1950s and the 1990s. The drip collar keeps water from sneaking in at the chimney crown, which is one of the most common failure points I run into on inspections. The round cap keeps rain and critters out while still letting the chimney draft properly. That last part really counts at our elevation, where the draft margins are already tighter than they'd be at sea level.

To put the pieces in plain terms, here's what each main component does once it's in your chimney:
- The liner: 25 feet of flexible 316 stainless that carries smoke and gases up the flue.
- The tee: the connection point where your appliance ties in, with a removable cap so we can clean it out later.
- The top plate and rip collar: seals and anchors the liner at the top of the chimney and sheds water away from the crown.
- The termination cap: the lid on top that blocks rain, leaves, birds, and squirrels while keeping the draft moving.
- Fasteners and instructions: the hardware and step-by-step guide to tie it all together.
How a Liner Installation Actually Works
People always want to know what a relining day looks like before they book it. There's nothing mysterious about it, and being walked through the steps usually takes the worry out of it. Here's the order we follow on a typical Denver job:
- Inspect and measure. We run a camera down the flue, check for cracks and blockages, measure the chimney height, and confirm the 6-inch size is right for your appliance.
- Pull the permit. Denver requires a permit for liner work that serves a heating appliance, so we file that before we start.
- Prep the chimney. We sweep out old creosote and debris, clear any obstructions, and remove the old damaged liner pieces if needed.
- Attach the tee and feed the liner. We connect the tee at the bottom and lower the liner down from the roof, guiding it past offsets and smoke shelves.
- Add insulation if the code calls for it. On exterior chimneys or tight-clearance runs, we wrap the liner in ceramic fiber insulation before it goes down.
- Seal the top and set the cap. We fasten the top plate, lock down the rip collar, and install the termination cap.
- Connect, test, and pass inspection. We hook up your appliance, check the draft, and coordinate the final inspection so everything's signed off.
Most single-flue jobs wrap up in a day. A tricky offset, a tall two-story chimney, or a chimney that needs masonry repair first can stretch it out, and we'll tell you that up front rather than springing it on you.
The step that saves people the most grief is the camera inspection at the very start. I've had homeowners convinced they needed a full reline when the real problem was a bird's nest or a cracked crown. I'd rather find that on day one than sell you a liner you didn't need. And if you do need one, measuring twice up front means the install goes smooth.
- Adam, Owner, Adam Chimney Sweep
Watch a Liner Installation in Denver
If you'd rather see it than read about it, here's one of our crews running a stainless liner on a real Denver job. It gives you a feel for the rooftop work and how the liner feeds down the flue.
Where This 6-Inch Liner Fits Best
The 6-inch diameter covers most residential heating setups. Over the years I've put these liners in for plenty of different appliances. Here are the ones that come up most:
Fireplace Inserts: Wood-burning and gas inserts in living rooms all over Washington Park, Cherry Creek, and the Highlands. The flexible liner bends around damper assemblies and smoke shelves that would stop a rigid pipe cold.
High-Efficiency Furnaces: Modern condensing furnaces need Category IV venting. The stainless steel stands up to the acidic condensate these units make, so you don't get the early failures I've seen with old aluminum liners.
Pellet Stoves: The smooth inside wall keeps creosote from building up and lets the fine ash from pellet fuel vent cleanly. I put one in a Lakewood ranch home last month, and the owner said the stove ran noticeably better afterward.
Oil Appliances: They're less common around Denver, but oil furnaces and boilers do well with stainless because it resists the sulfuric acid that forms during combustion.
Not every chimney wants a 6-inch liner, though. Some high-efficiency gas appliances spec a smaller 4-inch or 5-inch pipe, and a few big wood-burning fireplaces need 7 or 8 inches. Matching the liner to the appliance is part of what we sort out during the inspection, and it's why I don't recommend grabbing a kit off the shelf and hoping for the best.
Denver Building Code and Permits
Denver's building department wants a permit for chimney liner installs that serve heating appliances. The code here is built on the International Residential Code with some local amendments layered on top, and it sets rules for sizing, clearances, and how high the liner has to terminate above the roof. This kit meets those requirements as long as it's installed the way the manufacturer spells out.
The 25-foot length fits most single-story homes and a good number of two-story homes around Denver. Ranch houses in spots like Green Valley Ranch or Montbello usually have chimneys running 18 to 22 feet, which leaves enough material for a solid top-plate connection and the lower tee. Taller two-story homes sometimes need extra length, and that's one of the things we figure out during the first visit.
Insulation isn't in this basic kit, but a lot of Denver installs need it. When the liner runs up an exterior chimney, or when the clearance to nearby wood framing is tight, the code calls for an insulation wrap. We usually add half-inch ceramic fiber insulation, which runs another $275 to $450 depending on how tall the chimney is. It's not an upsell. It's what keeps the install legal and the heat where it belongs.
Professional Install vs. DIY
This kit comes with detailed instructions for handy folks, and I won't pretend a skilled DIYer can't follow them. But I still push hard for professional installation, and here's why. Denver requires permits and inspections, and work done without a permit can turn into a headache and a liability when you go to sell the house. Sizing and clearance math takes some real knowledge of appliance specs, altitude correction, and code. And honestly, climbing around on a Denver roof in our hit-or-miss spring and fall weather is just risky.
A professional install of this kit usually runs between $1,800 and $2,400. That covers the liner kit, insulation if it's needed, the permit, labor, and getting the final inspection scheduled and signed off. You're paying for code compliance, a liner that actually drafts right, and a warranty that stays valid. Speaking of which, most warranties only hold up if a pro does the work.
So how do you decide? Run through this quick gut-check before you climb a ladder:
- Are you comfortable working safely on a steep or tall roof in changing weather?
- Do you know how to pull a Denver permit and schedule the inspection?
- Can you calculate the right size and clearances for your specific appliance?
- Are you OK with the warranty possibly voiding if the install isn't done by a pro?
If any of those gives you pause, it's worth a phone call. The cost of fixing a botched DIY liner usually wipes out whatever you saved trying to do it yourself.
The Lifetime Warranty
The lifetime warranty on this liner says a lot about how confident the manufacturer is in the materials and the build. It covers defects in materials and workmanship for as long as you own the home, which is unusually strong in a field where 10- to 20-year warranties are the norm.
That said, the warranty has conditions. It expects a proper install, the right application, and regular upkeep. Annual chimney inspections, which we offer starting at $199, confirm the liner is still in good shape and catch small problems before they turn into safety or performance issues. I've watched homeowners lose their coverage over a sloppy install or skipped maintenance, and those are exactly the situations that good professional service heads off.
Common Liner Problems We See in Denver
After years of pulling cameras through Denver flues, the same handful of issues keep showing up. Knowing the warning signs helps you catch trouble early instead of after a backdraft fills the house with smoke.
- Cracked clay tiles. Old masonry liners crack from heat cycling and from water freezing in the joints. Once they crack, combustion gases can leak into the house.
- White staining or efflorescence on the exterior brick. That's usually moisture moving through the chimney, and it often points to a failing liner or crown.
- Rust flakes or debris in the firebox. If a metal liner is corroding, you'll sometimes find the evidence at the bottom.
- Smoke rolling back into the room. Poor draft can mean the flue is blocked, undersized, or breaking down.
- A strong odor when the fireplace isn't in use. Often a creosote or moisture issue tied to liner trouble.
If you're seeing any of these, don't keep running the appliance and hope it sorts itself out. A cracked or corroded liner is a carbon monoxide and chimney fire risk, and it's the kind of thing worth getting eyes on quickly.
The one I worry about most is when a homeowner smells something off but the fire still seems to burn fine. That mix of a leaky liner and a tight-drafting chimney at our altitude is how carbon monoxide sneaks into a house. If your gut says something's wrong with the fireplace, trust it and call somebody. A quick look is cheap. Ignoring it isn't.
- Adam, Owner, Adam Chimney Sweep
Why We Stock and Recommend This Liner
I've tried a lot of liner systems over the years serving Denver homeowners, and this Flex-All kit keeps earning its spot. It's made in the USA, so quality control is consistent and replacement parts are easy to get. The 316 stainless gives you the longevity our climate demands. And the complete kit takes away the headache of ordering bits and pieces from three different suppliers and praying they all show up.
I put this exact system in my own house when I moved to Aurora three years back. My wood-burning insert vents great through it, draws clean from the first match, and keeps a steady burn even on the long winter nights. That's not a sales line. It's the reason I feel good recommending it to customers across the metro.
Quick Answers to Common Questions
How long does a chimney liner last?
A properly installed 316 stainless liner like this one can last decades with regular inspections and basic maintenance. The lifetime warranty backs that up. Skipping annual checks or burning unseasoned wood will shorten its life, so upkeep matters.
Do I really need a permit for this in Denver?
Yes, when the liner serves a heating appliance. It's not just red tape. An unpermitted install can complicate a home sale and leave you on the hook if something goes wrong. We handle the permit as part of the job.
Will a 6-inch liner work for my fireplace?
Often, but not always. Six inches suits a lot of inserts, stoves, and furnaces, but some high-efficiency gas units want 4 or 5 inches, and large wood-burning fireplaces may need more. We confirm the right size during the inspection before anything gets ordered.
Can I install it myself to save money?
The kit includes instructions, so a skilled DIYer can technically do it. But between permits, roof safety, sizing math, and keeping the warranty valid, most people come out ahead hiring a pro. A failed DIY job usually costs more to fix than it saved.
How much does a full installed liner cost?
For this kit, professional installation generally runs $1,800 to $2,400, including the liner, insulation if it's required, the permit, labor, and the final inspection. We give you a written estimate up front so there are no surprises.
Getting Started With Your Liner Installation
If you're weighing a chimney reline, whether it's for a new appliance, a deteriorating masonry chimney, or a switch from wood to gas, this kit gives you a solid foundation. The first move is a thorough inspection to confirm the size, measure the chimney height, check the clearances, and spot any prep work the chimney needs before the liner goes in. You can read more about what that visit covers on our chimney inspection page, or browse everything we offer on our services page.
Call us at (720) 207-9232 to set up your chimney evaluation. We'll figure out whether this 6-inch kit fits your appliance or whether you need a different diameter. We'll check whether insulation is required for your specific chimney, hand you a detailed written estimate that covers every cost, and take care of the permits and inspections so the whole thing stays code-compliant. If your chimney also needs masonry work, our chimney repair team can fold that into the same visit.
Our shop at 12894 E Villanova Dr in Aurora puts us in easy reach of the entire Denver metro. Whether you're downtown, out in the southern suburbs, or in the eastern plains communities, you get the same careful work and attention that's earned us hundreds of five-star reviews. For more background on liner standards and chimney safety, the Chimney Safety Institute of America is a solid, no-nonsense resource worth a look.
This Flex-All 6-inch stainless steel liner kit is a smart investment in your home's safety and how well it heats. With a proper professional install and a little regular maintenance, it'll give you decades of dependable service, protecting your family and keeping your heating system running efficiently through one Colorado winter after another.