The Cheapest Way to Reline a Chimney: A Denver Pro's Honest Cost Guide
![]() The cheapest way to reline a chimney is to match the liner to your appliance, skip the parts you don't need, and time the job for the off-season. Relining isn't cheap, but you can knock real money off the bill without cutting corners that come back to bite you. I've lined hundreds of chimneys across Denver since 2001, and below I'll walk you through what actually drives the price, where you can save, and where saving a few bucks turns into a safety problem.
The cheapest way to reline a chimney is to match the liner to your appliance, skip the parts you don't need, and time the job for the off-season. Relining isn't cheap, but you can knock real money off the bill without cutting corners that come back to bite you. I've lined hundreds of chimneys across Denver since 2001, and below I'll walk you through what actually drives the price, where you can save, and where saving a few bucks turns into a safety problem.
 Adam Pros Provide Cheap Chimney Lining Solutions In Colorado
Here's the short version before we dig in: the liner itself is rarely the big number. Labor, roof access, and whatever repairs your chimney needs first are what move the total. So the smartest savings usually come from planning, not from buying the flimsiest material on the shelf.
Material Options for Chimney Relining
![]() Your liner choice sets the floor for the whole job. Pick the wrong one and you'll either overpay for protection you don't need, or worse, install something that can't handle what you're burning. Here's how the common materials stack up.
Your liner choice sets the floor for the whole job. Pick the wrong one and you'll either overpay for protection you don't need, or worse, install something that can't handle what you're burning. Here's how the common materials stack up.
Aluminum Liners
Aluminum is the cheapest material you'll find for chimney relining, running around $200. The catch is real, though. It only works with natural gas appliances rated at 83% efficiency or lower. Try to use it with oil, wood, or a high-efficiency gas furnace and the acidic byproducts will eat right through it. For the right setup it's a fine, budget-friendly pick. For the wrong one, it's money you'll spend twice.
Stainless Steel Liners
Stainless steel costs more than aluminum, but it handles just about anything and lasts for decades. It's what I install on most homes here. A few flavors to know:
- Basic Grade 304 Stainless Steel: Handles most residential setups and costs less than the premium grades.
- Flexible Stainless Steel Liners: Bend around offsets, go in faster, and usually run cheaper than rigid pipe.
- Pre-Insulated Liners: Save you the step of wrapping insulation later, but you pay more up front for the convenience.
Nine times out of ten when somebody calls me about the cheapest liner, they're picturing aluminum. But if you've got a wood stove or a 90-plus furnace, aluminum will be junk in a couple winters. I'd rather put in 304 stainless once and never hear about it again than reline the same flue twice in five years.
- Adam, Owner, Adam Chimney Sweep
Clay Tile Liners
Clay tiles are common in older masonry chimneys around Denver. The tile itself is cheap, but getting it in is slow, dusty work, and that labor adds up fast. For a homeowner trying to save, clay usually isn't the bargain it looks like on paper.
Cast-in-Place Liners
These are the gold standard for durability. A cement-like mix gets poured into the chimney and forms one seamless liner with no joints. They cost the most up front, but they can outlast the rest of the house. Not a budget pick, but worth knowing about if you plan to stay put for the long haul.
The Cheapest Way to Reline a Chimney: DIY vs. Professional Cost Comparison
This is the first real fork in the road, and it's where most of the savings questions land. Doing it yourself can cut the bill in half. It can also turn into a weekend on a roof you'd rather not be on. Let's look at both sides with honest numbers.
DIY Installation
Going the DIY route can save you a chunk of change. Relining still takes planning, the right tools, and a real respect for code and safety. It's not impossible for a handy homeowner, but it's not a casual Saturday job either.
- Chimney Liner Kits: Basic kits run $120 to $800. Pre-insulated kits land between $650 and $1,000.
- Additional Materials: Thermal blanket insulation kits ($125-$380), plus clamps and adapters, add to the cost.
- Inspection and Cleaning: A pro inspection and sweep, which you really want done first, runs $150 to $250.
- Permits: Pulling the right permits costs $100 to $150.
Total DIY Cost: $300 to $800 for a basic install, plus your own time and sweat.
 “Prevent Chimney Fires: Adam’S Professional Lining Safety Service”
Professional Installation
Hiring a certified pro gets you a proper install plus the stuff that's easy to overlook: a warranty, code compliance, and someone who's done it a thousand times.
- Labor Costs: Standard labor runs $500 to $1,500, depending on how steep your roof is and how tall the chimney sits.
- Material Costs: A basic aluminum install runs about $625. High-end stainless setups can top $7,000.
- Inspection and Maintenance: Folded into most professional packages.
Total Professional Cost: $1,800 to $4,000 on average, with premium jobs reaching $7,000.
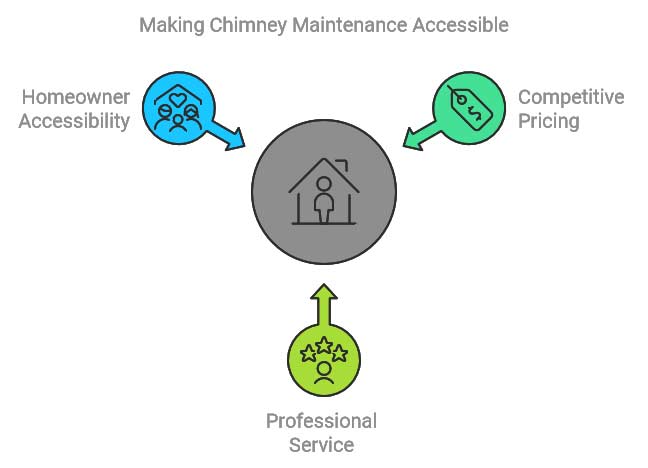
Cost-Saving Tips for Chimney Relining
Now the good part. These are the levers that actually move your bottom line, in roughly the order I'd reach for them.
Material Selection
- Single-wall liners cost less than double-wall, at $20-$40 per foot versus $40-$90 per foot.
- Flexible Liners: Faster and easier to install, which trims labor.
- Bare Stainless Steel: Gives most homes plenty of protection without the premium add-ons.
Strategic Timing
- Book your install in spring or fall, the off-peak stretch, when a lot of contractors will shave 10-20% off.
- Stay away from the dead of winter. That's when everybody calls at once and labor costs climb.
Bundling Services
- Pair the liner install with other work like an inspection and sweep so you're not paying twice to get a crew out.
- A lot of shops, mine included, offer package pricing when you bundle.
Obtaining Multiple Quotes
- Get itemized estimates from at least three certified pros, not just a number scribbled on the back of a card.
- Ask about price-matching and financing to bring the up-front hit down.
If you want my single best money-saving tip, it's call in October, not January. Come the first cold snap, my phone doesn't stop, and the off-season discount goes away because I just don't have the open slots. Same liner, same crew, sometimes a couple hundred bucks cheaper just because you beat the rush.
- Adam, Owner, Adam Chimney Sweep
The DIY Approach: What You Need to Know
If you're set on doing it yourself, go in with eyes open. Here's what the job actually involves.
Tools and Equipment
A typical DIY reline needs a power drill, a tape measure, and the right chimney brushes. For a one-time job, renting the specialty gear usually beats buying it.
Safety Precautions
Working up on a roof is no joke, especially on Denver's steeper pitches with snow or ice in play. Use a real harness and a stable ladder, and follow local building codes so you don't get hit with fines or a failed inspection down the line.
Installation Steps
- Measure your chimney carefully so you buy the right liner length and diameter the first time.
- Clean the flue thoroughly before anything goes in.
- Assemble the liner kit the way the manufacturer spells out.
- Feed the liner down the chimney and lock it in with clamps and brackets.
- Insulate it with a thermal blanket or another approved method.
- Cap it off and have the work inspected before you light a fire.
Professional Installation: Why It May Be Worth the Cost
Certified pros bring the experience, the tools, and the safety setup that's tough to match on your own. A professional job usually includes:
- A full inspection of the chimney structure, top to bottom.
- Straight advice on the best material and method for your setup.
- Warranty coverage on both materials and labor.
- Sign-off that the work meets local code.
 “Breaking: Adam Chimney Lining Just Opened Next Week’S Calendar”
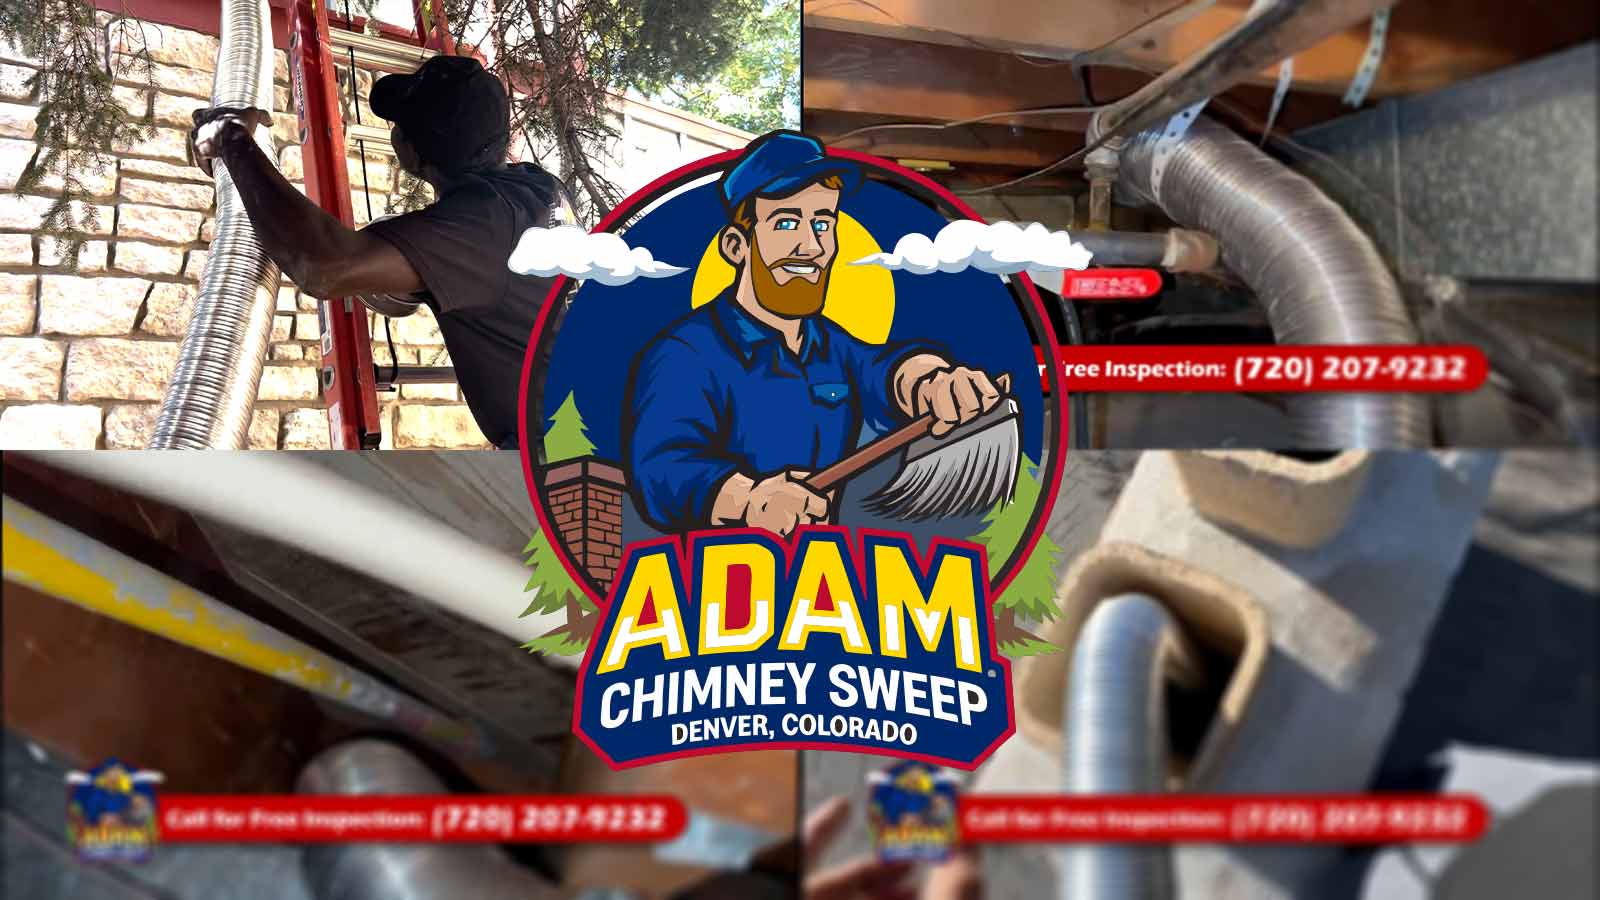
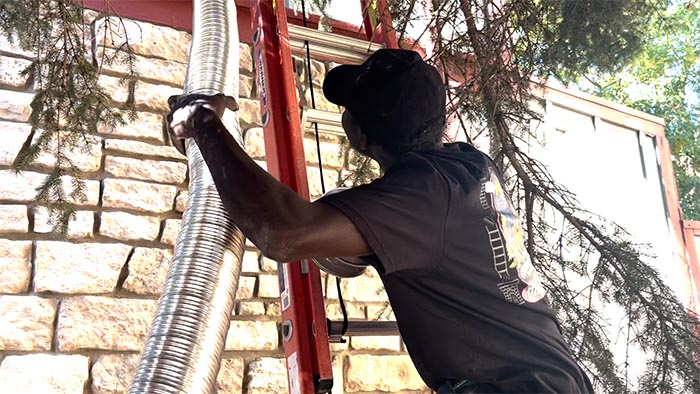
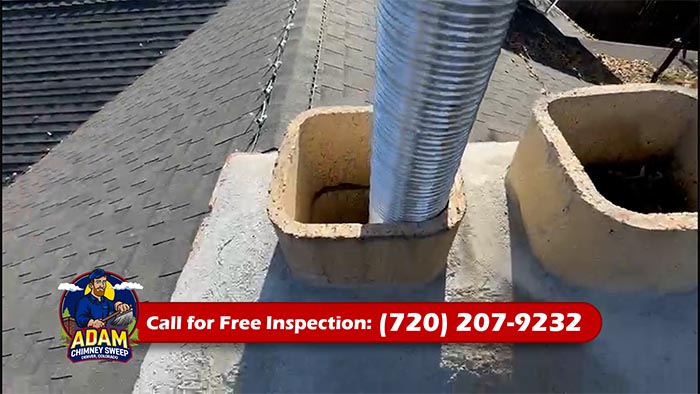
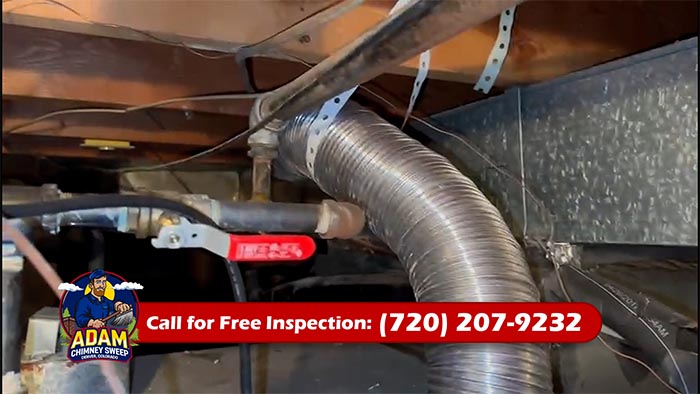
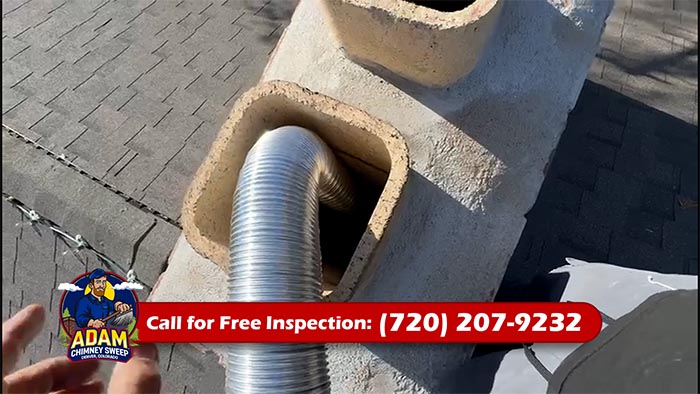
See a Chimney Reline in Action
Reading about it only goes so far. Here's a walkthrough of how we run a liner from the rooftop down, so you can see what a clean install actually looks like before you decide which way to go.
Essential Considerations for Cost-Effective Chimney Relining
Longevity vs. Upfront Savings
Aluminum wins on sticker price, no question. But it doesn't hold up like stainless. Spend a little more on a better liner and you'll likely save it back in fewer repairs and a longer service life.
Code Compliance
Make sure your materials and install meet local building codes. Skip that and you're looking at fines or tearing the work back out to redo it right.
Safety First
DIY or pro, safety comes before savings every time. A bad install can lead to a chimney fire, a carbon monoxide leak, or both. That's not a corner worth cutting to save a hundred bucks.
Advanced Cost-Saving Strategies
Use Alternative Insulation
Instead of premium pour-in insulation, a ceramic blanket gives you strong heat protection for a fraction of the price.
Buy Kits Instead of Individual Components
Complete kits usually come bundled at a discount versus piecing the parts together one at a time.
Negotiate with Contractors
Plenty of us will talk price, especially in the slow months. Don't be shy about asking for a discount or a payment plan.
 “Don’T Let Fall Pass Without Adam Chimney Lining’S Essential Service”
Extended Cost Analysis: Balancing Affordability and Long-Term Benefits
Picking the cheapest way to reline a chimney means looking past the first invoice. Weigh how long the material lasts, how much labor it takes, and how well it keeps you safe, and the real value starts to show.
Material Lifespan and Durability
Aluminum Liners
- Lifespan: Usually 10 to 15 years.
- Suitability: Natural gas appliances only.
- Maintenance Needs: Needs regular checks to stay sound, and our Colorado freeze-thaw swings are hard on it.
Stainless Steel Liners
- Lifespan: Often 20 to 30 years with little fuss.
- Corrosion Resistance: Grade 316 is the call for wood and oil because it shrugs off the acidic byproducts better.
- Long-Term Savings: Costs more day one, but lasts long enough to skip a replacement and most repairs.
Clay Tiles
- Lifespan: Can go decades, but cracks under thermal stress.
- Repair Costs: Swapping individual tiles is slow, pricey work that can wipe out the upfront savings.
Cast-in-Place Liners
- Lifespan: Built to last, often past 50 years.
- Cost-Effectiveness: High to install, then basically maintenance-free, so it suits folks staying for the long run.
 “Realtors’ Secret: Why They All Choose Adam Chimney Lining First”
Hidden Costs of Chimney Relining
These are the line items that surprise people. None of them are optional if you want the job done right, so build them into your budget from the start.
Inspection and Cleaning
Skip these and you risk a hidden blockage or a liner that doesn't seat right. Set aside $150 to $250 for a pro sweep and inspection, whether you DIY or hire out.
Structural Repairs
A cracked or crumbling chimney can drive the price up fast. Be ready for things like:
- Repointing Brickwork: $300 to $1,000, depending on how bad it is.
- Crown Repairs: $750 to $1,000 for small fixes, more for the big ones.
- Smoke Chamber Repairs: $500 to $2,000.
Permits and Compliance
Dodge the permit fees and you might pay more later in fines or redo work. Budget $100 to $150 for local permits and inspections.
The number that catches people off guard isn't the liner, it's the crown or the brickwork underneath. I won't drop a brand-new stainless liner into a chimney that's leaking water through a cracked crown. That's just trapping moisture against good steel. We fix the shell first, then line it, and that order saves you a callback.
- Adam, Owner, Adam Chimney Sweep
Environmental and Efficiency Considerations
Energy Efficiency
The right liner improves your appliance's efficiency by giving you a strong, steady draft and better heat retention. Pair stainless with proper insulation and you'll see it on the heating bill.
Eco-Friendly Options
- Recycled Materials: Some makers offer liners from recycled metal, so you get durability and a lighter footprint.
- Energy Star Appliances: A relined chimney paired with an Energy Star appliance gets you the most efficiency and the fewest emissions.
 Investment Protection: Adam’S Complete Chimney Reline
Comparison of Labor Effort: DIY vs. Professional
DIY Installation Time
A typical DIY reline runs 6 to 12 hours, depending on chimney height, how tricky the layout is, and how comfortable you are up there.
Professional Installation Time
A pro crew usually wraps it in 4 to 8 hours. What stretches that out:
- Roof pitch and how hard the chimney is to reach.
- Chimney height and overall condition.
- The type of liner going in.
Real-Life Cost Scenarios
Numbers in a table are one thing. Here's how they shake out on real Denver jobs.
Scenario 1: Budget-Friendly DIY
- Materials: Basic aluminum liner kit ($200), thermal blanket ($150).
- Inspection: $200.
- Permit: $100.
- Total Cost: $650.
Scenario 2: Mid-Range DIY
- Materials: Flexible stainless steel liner kit ($750), insulation kit ($250).
- Inspection: $200.
- Permit: $100.
- Total Cost: $1,300.
Scenario 3: Professional Installation
- Materials and Labor: A standard stainless steel liner ($2,000) and labor for a steep roof ($1,000).
- Inspection Included.
- Permit: Included.
- Total Cost: $3,000.
Advanced Cost-Saving Techniques
Buy Direct from Manufacturers
Buying liner kits straight from the maker can save 10 to 20% over retail. Watch for seasonal sales.
Opt for Group Discounts
If a few homes on your block need lining, organize it together. A lot of contractors will cut the per-home price for a bulk job.
Consider Partial DIY
If you're handy with the basics, split the work. For example:
- Handle the inspection and cleaning prep yourself.
- Bring in a pro for the safety-critical part, the actual liner install.
 “Property Enhancement: Adam’S Professional Chimney Reline Services &Amp; Care”
Warning Signs Your Chimney Needs Relining
Not sure if you even need this yet? Here are the red flags I tell Denver homeowners to watch for. If you spot any of these, get an inspection before the next burning season:
- Chunks of clay tile or flaking material showing up in the firebox.
- A strong, lingering smoky smell even when nothing's burning.
- White staining (efflorescence) or water spots on the chimney or nearby walls.
- Rust on the damper or firebox, which often means moisture is getting where it shouldn't.
- Poor draft, smoke spilling back into the room, or a fire that won't stay lit.
- An inspector flagging gaps, cracks, or a missing liner on an older home.
Frequently Asked Questions (FAQs)
1. What is the cheapest material for chimney relining?
Aluminum is the cheapest, but only for the right job, namely lower-efficiency natural gas appliances. It won't hold up to wood, oil, or high-efficiency gas, so cheap up front can mean replacing it sooner than you'd like.
2. Is DIY chimney relining safe?
It can be, if you follow every safety step, use the right tools, and meet local code. Get any of that wrong and you're risking a fire or a CO leak, so be honest with yourself about the work before you start.
3. Can I reuse an old chimney liner?
Don't. Wear and tear over the years compromises the integrity and the draft, and reusing one isn't worth the risk.
4. How can I make sure my chimney relining is code-compliant?
Check your local building codes or bring in a certified pro to confirm your materials and install meet the standard.
5. How long does a chimney reline take in Denver?
A straightforward pro install usually takes half a day to a full day. Steep roofs, tall chimneys, and any repairs we find first can push that longer.
Final Thoughts: Investing in Value
The cheapest option up front isn't always the cheapest over five or ten years. A durable liner and a solid install save you on repairs, replacements, and heating costs down the road. Weigh your real needs, use the savings tricks above, and you'll land on a reline that's both affordable and built to last.
Heat Retention and Efficiency with Proper Insulation
The Role of Insulation
Wrapping insulation around your liner does three things: it holds heat better, sharpens the draft, and shields the liner from corrosive byproducts.
- Insulated Liners: Pre-insulated pipe is convenient and saves a step, but you pay a premium for it.
- DIY Insulation: A thermal blanket kit ($125 to $380) is the budget-friendly way to get there.
- Pour-In Insulation: Gives a seamless fit, but you've got to apply it carefully to avoid gaps.
Energy Savings
An insulated liner keeps your appliance running efficiently, and over a few seasons those savings start to pay back what the insulation cost you.
Safety Features: A Worthy Investment
Chimney Caps
A cap keeps debris, rain, and critters out of the flue. It's a small spend ($50 to $200) that stretches the life of your liner by cutting down on wear.
Spark Arrestors
If you burn wood, a spark arrestor lowers the chance of a chimney fire. They usually run $75 to $250 depending on size and material.
Rain Shields
Moisture speeds up corrosion on both aluminum and stainless. A rain shield, around $100 to $300, helps protect what you just paid for.
 Energy Savings Expert: Adam’S Chimney Reline Solutions
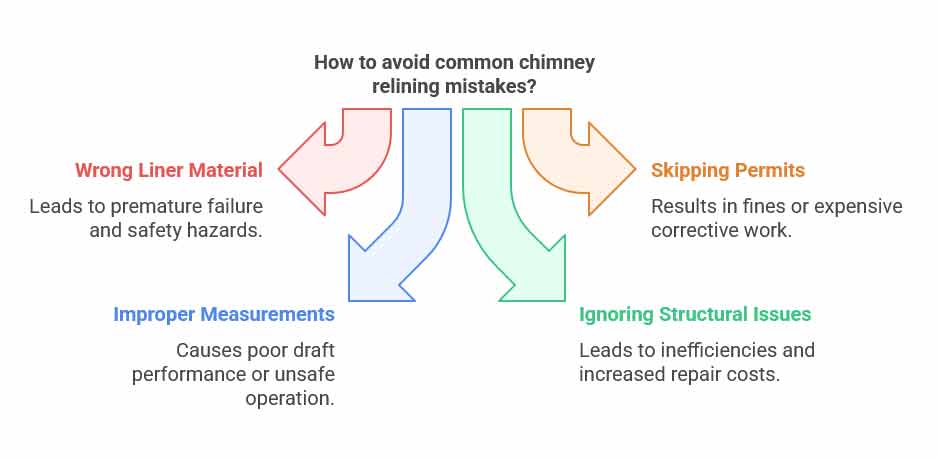
Common Mistakes to Avoid in Chimney Relining
Choosing the Wrong Liner Material
Putting an aluminum liner on a wood stove or a high-efficiency appliance is asking for early failure and a safety hazard. Always match the liner to what you're actually burning.
Skipping Permits
Ducking the permit fee saves a little now and can cost a lot later in fines or corrective work. Pull the permit.
Improper Measurements
A liner that's the wrong size drafts poorly or runs unsafely. Measure the height and diameter twice before you buy.
Ignoring Structural Issues
Lining a chimney without fixing the cracks, leaks, or weak mortar underneath just bakes the problem in. Inspect and repair first, then line.
Financing and Budgeting Options
If the up-front number is steep, you've got a few ways to spread it out:
Contractor Payment Plans
Lots of chimney shops offer installment plans so you can pay over a few months instead of all at once. Handy for the premium jobs.
Home Improvement Loans
For a high-end solution like a cast-in-place liner, a low-interest home improvement loan can cover it without draining savings.
Energy Efficiency Rebates
Some utilities give rebates for efficient home upgrades, and lining can qualify. Check your local programs to see if you're eligible.
 “Real Estate Ready: Adam’S Chimney Lining Certification”
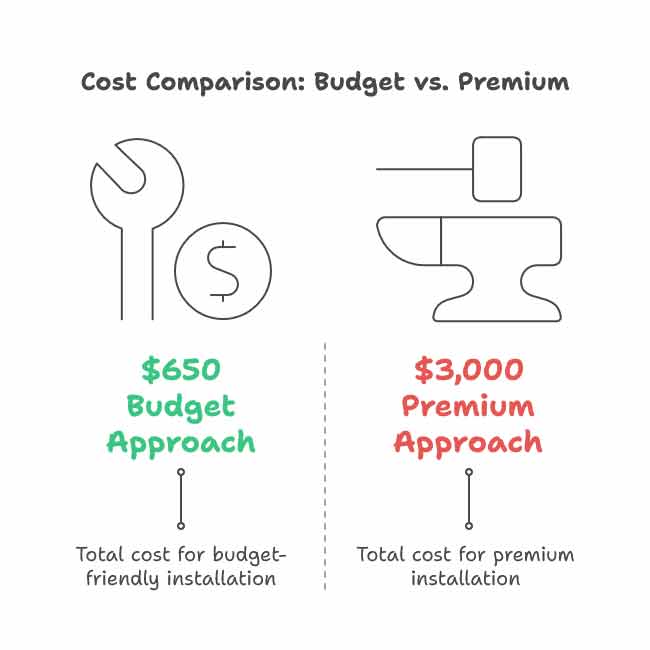
Real-Life Case Study: Budget vs. Premium Approach
Scenario 1: Budget-Friendly DIY
- Materials: Flexible aluminum liner ($200), thermal blanket insulation ($150).
- Labor: DIY install, no labor cost.
- Additional Costs: Inspection ($200), permits ($100).
- Total Cost: $650.
This works for a homeowner with the basic tools, a simple chimney, and some real DIY experience under their belt.
Scenario 2: Premium Professional Installation
- Materials: Grade 316 stainless steel liner with pre-insulation ($1,500).
- Labor: Pro install on a steep roof ($1,500).
- Additional Costs: Inspection, cleaning, and permits all included.
- Total Cost: $3,000.
This one's for complex chimneys, homes with wood-burning stoves, or anyone who'd rather pay once and not think about it.
 “Cheapest Reline: Adam’S Professional Chimney Solutions”
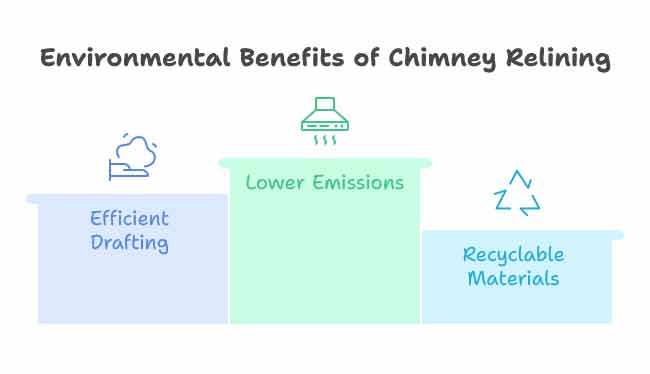
Environmental Impact of Chimney Relining
A good reline also lightens your home's footprint:
- Efficient Drafting: Better draft means your appliance burns cleaner and uses less fuel.
- Lower Emissions: A properly lined flue burns more completely, so fewer pollutants go up and out.
- Recyclable Materials: Stainless and aluminum liners can usually be recycled when they're done.
If you want to read up on cleaner-burning practices straight from the source, the EPA's Burn Wise program is a solid place to start, and the Chimney Safety Institute of America covers liner standards and finding certified sweeps.
Additional DIY Tips for Reducing Costs
Repurpose Tools
Rent or borrow gear like a crimping tool or pipe cutter instead of buying. That alone can save $50 to $100 a tool.
Use Local Suppliers
Buying from a local supplier cuts shipping and makes returns or swaps a lot easier if something's wrong.
Collaborate with Neighbors
If a few homes nearby need lining too, group up and negotiate a bulk rate with a local contractor.
Future Maintenance to Extend Liner Life After You Reline a Chimney
Lining the chimney isn't the finish line. A little upkeep keeps your investment going as long as possible:
- Annual Inspections: Catch small issues before they grow. Runs $100 to $300.
- Routine Cleaning: Keep creosote in check with regular sweeps, $100 to $250 a session.
- Monitor for Damage: Keep an eye out for rust or cracks and deal with them early.
Conclusion: Finding the Right Balance
Whether you're a budget-minded DIYer or you'd rather hand a pro the keys, there's a relining setup that fits. Think through your materials, your timing, and the safety extras, and you'll cut costs where it's smart while ending up with a system that's durable, efficient, and built for Colorado winters.
If you'd rather skip the rooftop work and get a straight quote, give Adam Chimney Sweep a call at (720) 207-9232 or head over to our chimney inspection page to book a look first. You can also check the official Colorado Building Codes’ website for the local requirements.